
After posting the first map in my campaign setting to r/worldbuilding, I had a few PMs asking after a more detailed guide to publishing maps that exceed the 8192px² limit in Photoshop and Illustrator.
First off, thanks to Ian Gilman (u/iangilman), my meatspace friend and mentor; OpenSeadragon is his baby, and I might not have been able to do this without his help. He’s happy to assist with with technical questions.
I use png format, as I noticed no lag in testing vs jpg, I’m picky about compression artifacts, and why not. The thing is a beast anyway. See my note about transparent layers at the end.
0. Required Tools
- ImageMagick – install
- libvips – install
- OpenSeadragon – see below
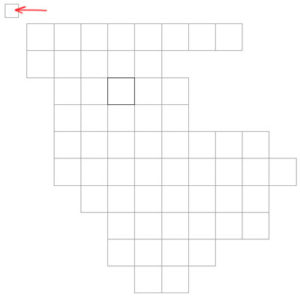
1. Map Prep
My map is drawn over a grid of artboards (below). “Open ocean” / “blank” tiles can be repeated to fill in empty space, and items like map legends can be easily swapped in on tiles from other Illustrator files in this way.

How many squares/how detailed you need to be will depend, and will require trial and error (I started at 6000px² per tile and worked down to 2000 before settling on 3000).
You’ll note a tiny reference artboard off to the side. Illustrator limits to 100 artboards – my complete map (not shown below) is about 150 squares, which for me is only one “continent” – you may need a common cut & paste anchor between files.
Lastly, duplicate your text layers. There, select all, and go to Type > Create Outlines. This is critical when using fonts not in ImageMagick’s font list, which you probably are. You can update that list manually; this is less work.
Note: Illustrator strips a couple pixels from the edge of each artboard, which seems unavoidable, so you do lose some artwork. I went to lengths to ensure that minimal text or other objects crossed artboards, to minimize damage.
![]()
Photoshop: Not as familiar with, but cursory googling implies you can use artboards similarly; I’m sure someone can comment on this in the thread.
2. Create SVGs
Once you have your artboards, go to File > Save As, select SVG as the Save As Type, and check Use Artboards. An SVG Options menu will pop up. Hit OK.
Photoshop: I think that File > Extract Assets will get you svg exports.
3. Convert to Image Files
You can skip this step if you have a perfect grid, but I needed to fill empty spaces with repeat tiles, and found being able to visualize them in their folder helpful.
In the command line, navigate to the folder your svg tiles are in, and execute the below (adjust -size as desired). See basics, more details on ImageMagick’s mogrify program:
$ mogrify -format png -size 3000x3000 *.svg
If you get “unable to read font” errors, you missed converting some font to objects; -verbose might help ID which tiles you missed.
4. Combine your PNGs
Once you’ve converted your svgs to pngs, fill in repeat tiles if necessary, and name your files sequentially.
We’ll use ImageMagick’s montage program next. Here is a good rundown of the options I used below. In the folder your pngs are in, execute:
$ montage -density -tile 8x0 -size 3000x3000 -geometry +0+0 -border 0 *.png output.png
The first number in -tile is the count of tiles across your map is; set -size to the size of your individual tiles. montage will begin with the first alphanumeric file of type *.png.
5. Compile a Deep Zoom Image (DZI)
For libvips to work, you need to navigate to the folder in which libvips lives, and run the following from there:
$ vips dzsave C:\path\to\input.png youroutputname --suffix .png
This will output a folder and a .dzi file into the folder you execute from. You need both. By default, dzsave outputs jpg; –suffix gets you that high-res goodness.
For those interested, here‘s a good writeup on the DZI format.
6. Build an OpenSeadragon Page
See here for details on running OpenSeadragon locally.
Using the example from the OpenSeadragon Getting Started page, the simplest implementation is as follows:
<div id="openseadragon1" style="width: 800px; height: 600px;"></div>

<script src="/openseadragon/openseadragon.min.js"></script>
<script type="text/javascript">
  var viewer = OpenSeadragon({
    id: "openseadragon1",
    prefixUrl: "/openseadragon/images/",
    tileSources: "/path/to/my/image.dzi"
  });
</script>
Easy as that. Upload the following, your directory should look like this:
/map.html

/openseadragon/images/
/openseadragon/jquery.min.js
/openseadragon/openseadragon.js
/openseadragon/openseadragon.min.js

/dzi/mapfiles/
/dzi/mapfile.dzi
X. Note on Transparency
Working with transparent layers is a bit of a hassle. See this post for more.
![]()
I hope this was helpful. Please let me know if I missed something or if you know of other methods. I can’t wait to see what you come up with!